Menus
The menu consists of
File Menu
New
Creates a new project and sets all values to default value.
Open
Opens a file-chooser dialog to select an existing ‘.gem’ (geotechnical engineering model) project file to load. The values of the current project are not saved and it doesn’t prompt the user to save the data.
Save
Saves the existing project to the ‘.gem’ file. If a file is not already specified, it opens the file-chooser dialog to select the name of the file to be saved. The project properties and input parameters are saved into the file.
Save As
Opens a file-chooser to select the file to save the project to.
Export to Excel
Exports the project properties, input parameters, analysis to an excel (.xlsx) file.
Select the parameters to be exported in the ‘Export to Excel’ dialog window and click ‘Export’. In the following file-chooser dialog, specify the export file.
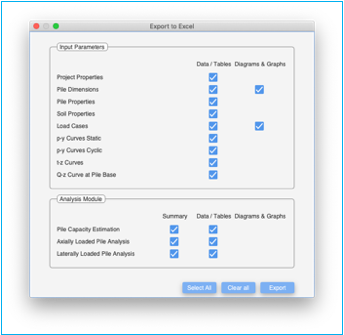
Note: To avoid stale analysis values being exported, rerun the analysis using the compute menu and then export the contents to excel.
Note: Analysis results are exported for analysis models having FULL / valid SUBSCRIPTION licenses. Results for analysis models with trial licenses are not exported and the respective fields in the ‘Export to Excel’ dialog window will not be selectable and greyed out.
Export to Word
Exports the project properties, input parameters, analysis to an MS Word (.docx) file.
Select the parameters to be exported in the ‘Export to Word’ dialog window and click ‘Export’. In the following file-chooser dialog, specify the export file.

Note: To avoid stale analysis values being exported, rerun the analysis using the compute menu. Visit all the results pages first prior to exporting the results to Word.
Note: Analysis results are exported for analysis models having FULL / valid SUBSCRIPTION licenses. Results for analysis models with trial licenses are not exported and the respective fields in the ‘Export to Word’ dialog window will not be selectable and greyed out.
Export to PDF
Exports the project properties, input parameters, analysis to a Portable Document Format (.pdf) file.
Select the parameters to be exported in the ‘Export to PDF’ dialog window and click ‘Export’. In the following file-chooser dialog, specify the export file.
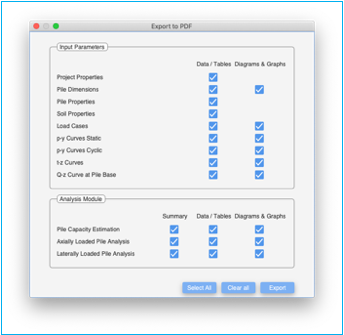
Note: To avoid stale analysis values being exported, rerun the analysis using the compute menu. Visit all the results pages first prior to exporting the results to PDF.
Note: Analysis results are exported for analysis models having FULL / valid SUBSCRIPTION licenses. Results for analysis models with trial licenses are not exported and the respective fields in the ‘Export to PDF’ dialog window will not be selectable and greyed out.
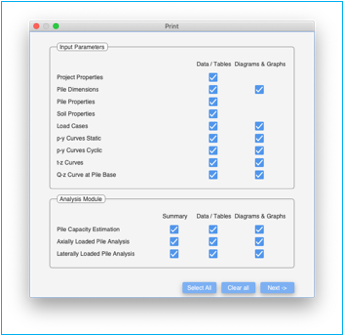
Select the parameters to be printed in the ‘Print’ dialog window and click ‘Next’
A printer selection dialog window will then open
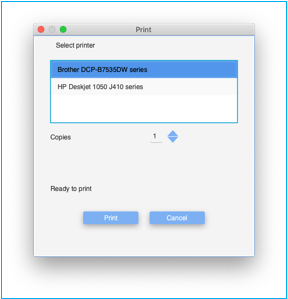
Select the printer from the selection list.
Select the number of copies to be printed.
Once the status indicates ‘Ready to print’, click on ‘Print’ to print the document.
The application can print only to a pdf capable printer. This functionality is not available on the cloud. The document will be rendered like the ‘export to PDF’ document.
Note: To avoid stale analysis values from being printed, rerun the analysis using the compute menu. Visit all the results pages first prior printing the results.
Note: Analysis results are printed for analysis models having FULL / valid SUBSCRIPTION licenses. Results for analysis models with trial licenses are not printed and the respective fields in the ‘Print’ dialog window will not be selectable and greyed out.
Preferences
Preferences are global preferences that are loaded at the start of the application. Some of these can be overridden with project specific values.
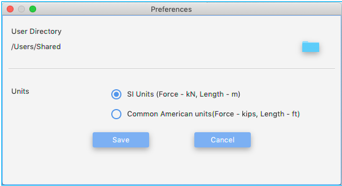
User Directory
This is the default directory where all project files will be stored. Click on the folder icon to select the directory. It will display a directory chooser dialog. The selection is displayed to the left of the folder icon
Units
The default units for the application can be set here. The choices include ‘SI units’ and ‘Common American units’. These are then applied to all future projects.
Specify the interval at which pile capacity should be calculated. If left blank, the pile capacity is calculated at layer boundaries and for 1 - 3 points within each layer depending on the thickness of the layer.
If a value is specified, pile capacity is calculated at layer boundaries and at the specified interval from the start of each layer. This only changes the pile capacity calculation.
Save
Save button saves the preferences for the application.
Cancel
Cancel button exits the preference dialog box without saving the changes.
Edit Menu
Cut
Cuts the current selection into the clipboard.
Copy
Copies the current selection into the clipboard.
Paste
Pastes the current selection from the clipboard.
Delete
Deletes the current selection.
Undo
Undo’s the last config change.
Redo
Reapplies the last undone change.
Compute Menu
Validate
Validate checks all the inputs for errors. If there are no errors, a notification indicating the same is displayed.

If there are errors, you will get notifications detailing each error.

Troubleshooting errors
Fill all the required parameters in the
‘Input Parameters’ pane and complete all the required tables. The mandatory
fields have a red star (![]() ) adjacent to the field.
) adjacent to the field.
1. Analysis Model (at least one model should be selected)
2. Number of load-cases.
a. Pile Length
b. Pile Diameter
c. Pile Thickness Table.
2. Pile Properties Tab (No mandatory fields)
Check the values against each parameter
3. Soil Properties Tab > Soil layer tab
a. Soil Layer Table: Mandatory if
- Auto compute of p-y tables are enabled for Lateral pile analysis
- Auto compute of t-z / Q-z tables are enabled for Axial pile analysis
- Pile capacity estimation module is enabled in project properties
b. Soil Layer Properties for each layer: Mandatory if
- Auto compute of p-y tables are enabled for Lateral pile analysis
- Auto compute of t-z / Q-z tables are enabled for Axial pile analysis
- Pile capacity estimation module is enabled in project properties
Refer to Soil Layer Properties for details on each field.
4. Soil Properties Tab > p-y static tab
If ‘Auto-generate p-y curves’ is enabled in this tab, entries in this tab are not editable. No further entries need to be made in this tab.
If ‘lateral analysis model’ is enabled in Project Properties Pane and ‘Auto-generate p-y curves’ is disabled on this tab and static loading scenarios are present in any of the load-case then
a) p-y Depth table needs to be populated till the length of the pile
b) p-y table needs to be specified for each of the pile depth. The p-y table must have at-least two entries.
5. Soil Properties Tab > p-y cyclic tab
If ‘Auto-generate p-y curves’ is enabled in this tab, entries in this tab are not editable. No further entries need to be made in this tab.
If ‘Lateral analysis model’ is enabled in Project Properties Pane and ‘Auto-generate p-y curves’ is disabled on this tab and cyclic loading scenarios are present in any of the load-case then
a) p-y Depth table needs to be populated till the length of the pile
b) p-y table needs to be specified for each of the pile depth. The p-y table must have at-least two entries.
6. Soil Properties Tab > t-z tab
If ‘Auto-generate t-z curves’ is enabled in this tab, entries in this tab are not editable. No further entries need to be made in this tab.
If ‘Axial analysis model’ or ‘Pile Capacity Estimation’ is enabled in Project Properties Pane and ‘Auto-generate t-z curves’ is disabled on this tab then
a) t-z Depth table needs to be populated till the length of the pile
b) t-z table needs to be specified for each of the pile depth. The t-z table must have at-least two entries.
7. Soil Properties Tab > Q-z tab
If ‘Auto-generate Q-z curves’ is enabled in this tab, entries in this tab are not editable. No further entries need to be made in this tab.
If ‘Axial analysis model’ or ‘Pile Capacity Estimation’ is enabled in Project Properties Pane and ‘Auto-generate Q-z curves’ is disabled on this tab then
c) ‘Q-z table at Pile Base’ needs to be specified. The Q-z table must have at-least two entries. Duplicate ‘z’ values in this table is not permissible.
a. For each load-case the following can be specified for Axial analysis
· Axial load (at pile head)
· ‘Include self-weight in axial analysis’ checkbox
· Additional loads at different depths can be specified in the ‘Concentrated Load Table’.
· Loads at a maximum of 20 unique depths can be specified across all load cases for axial analysis. If it exceeds this, an error will show against some load-cases in the ‘Axial analysis’ result pane.
b. For each load-case the following can be specified for Lateral analysis
· Lateral load, lateral moment, and axial load at pile head
· Loading type (static or cyclic loading)
· Distributed loads can be specified at the ‘Distributed Lateral Load’ pane. Otherwise, all the fields in this pane should be left blank.
· Additional loads at different depths can be specified in the ‘Concentrated Load Table’.
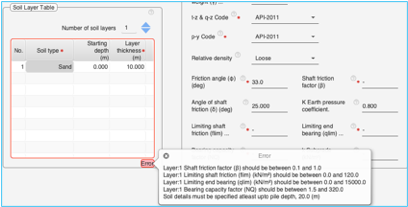
Incomplete tables will have a label at the bottom right hand corner indicating ‘info reqd.’. Hovering the mouse over the ‘info reqd.’ label indicates the nature of the information required.
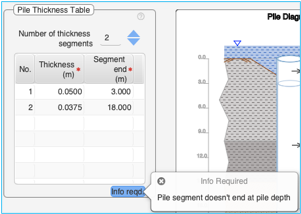
Tables with errors will highlighted with a red border with a label indicating ‘error’. Hovering the mouse over the ‘error’ label indicates the nature of error.
Clear Outputs
Clears all the output tables and graphs. This will clear all the tables and graphs in the ‘Pile Capacity Estimation’ pane, ‘Laterally Loaded Pile Analysis’ pane and ‘Axially Loaded Pile Analysis’ pane. It doesn’t clear data in the p-y, t-z and Q-z tabs in the ‘Soil Properties’ tab.
Compute
Selecting the compute performs the analysis for all the scenarios based on the parameters provided.
|
Analysis Model |
Analysis Performed |
|
Pile Capacity Estimation |
Pile capacity estimation t-z curve generation (if auto-generate is enabled) Q-z curve generation (if auto-generate is enabled) |
|
Axially Loaded Pile Analysis |
Axially loaded pile analysis for all load cases t-z curve generation (if auto-generate is enabled) Q-z curve generation (if auto-generate is enabled) |
|
Laterally Loaded Pile Analysis |
Laterally loaded pile analysis for all load cases p-y static curve generation (if auto-generate is enabled) p-y cyclic curve generation (if auto-generate is enabled) |
The application first validates the inputs. If inputs are not valid, it displays the errors and doesn’t proceed further. Refer to ‘validate’ for more details on trouble shooting errors.
If Inputs are valid, it proceeds to perform the analysis.
A successful analysis will pop up notifications for each analysis model selected for analysis.

The respective analysis panes will also be highlighted in green color to indicate that fresh results are available. Click on the panes to view the analysis.
![]()
If there are errors while performing the execution, or the execution takes more than 5 seconds to perform, the execution will error out with appropriate errors.
Tools Menu
Resolve Loads
Resolve loads is a handy tool to resolve loads about axial and lateral directions. Loads can be specified about
a) X, Y, Z axis
b) In axial and lateral directions
c) At an angle
The tool will resolve the loads from one format to the others. The GEMS Offshore pile foundation software requires the loads to be specified in axial and lateral directions.
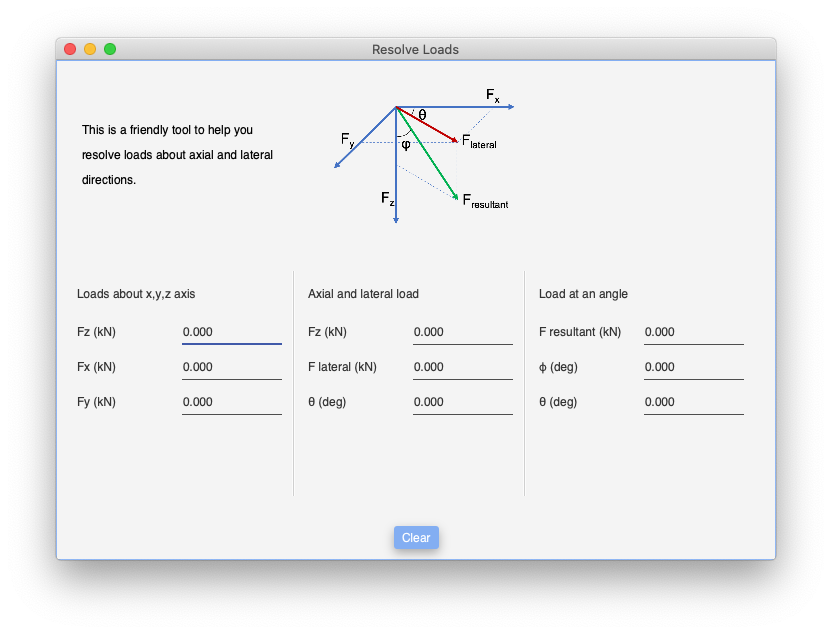
Press on the ‘Clear’ button to reset the values to zero.
Help Menu
License
License menu pops up a license dialog indicating the current status of the license.
There are three analysis modules which are licensed
1. Pile Capacity Estimation
2. Axially Loaded Pile Analysis
3. Laterally Loaded Pile Analysis
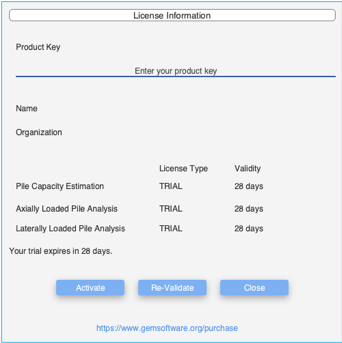
License information during trial period
Product Key
This is only applicable for desktop applications running on Windows / macOS and is not applicable for applications hosted on GEMS cloud. This is the product key for the license once you purchase any module. This field is editable if there is no product key associated with this application. Once a product key is applied and the application activated, they ‘Product Key’ field cannot be edited. The product key is tied to the machine once it is activated on the machine. Uninstalling the application will not remove the association of the product key with this machine. The product key can be disassociated after deactivating the license key by clicking the deactivate button.
Name
Name of the licensee to whom the product key is issued to. This field is populated by the application by downloading this information from the internet servers. This information is provided by the user at the time of purchase of the license.
Organization
Name of the organization to which the licensee belongs to. This field is populated by the application by downloading this information from the internet servers. This information is provided by the user at the time of purchase of the license.
License Type
Type of license for the analysis module. The values can be
TRIAL – This module can be used under trial license. The functionality of this module may be limited during the trial period. Trial period is typically 30 days from the date the application is installed on the machine. Internet connectivity is required to use the application if both modules are under trial. The application validates the trial license with our servers on the internet each time it is launched.
EXTENDED_TRIAL – This module can be used under trial license. The functionality of this module may be limited during the extended trial period. The license is valid for the extended trial period shown. Internet connectivity is required to use the application if all the modules are under extended trial. The application validates the trial license with our servers on the internet each time it is launched.
SUBSCRIPTION – This module has a subscription license and there are no restrictions in functionality. The license period is for the period shown and requires renewal prior to the expiry date. One is advised to renew the license before the expiry date to avoid any discontinuity. Please contact support@gemsoftware.org or visit www.gemsoftware.org/purchase to renew the subscription. The application validates the license periodically with our servers for validity.
FULL – This module has a full license and there are no restrictions in functionality. The license period is permanent & perpetual. The application validates the license with our servers periodically for validity.
EXPIRED – The license period has expired. Please contact support@gemsoftware.org or visit www.gemsoftware.org/purchase to purchase license for this module. Click on ‘revalidate’ if you feel that the license may still be valid. The application cannot be used if all licenses are in INVALID / EXPIRED / UNKNOWN state.
INVALID/UNKNOWN – The state of the license cannot be. This may happen if the application cannot validate license information against our servers on the internet. Click on ‘Revalidate Button’ to contact our servers on the internet to get updated information. When the application is first installed, the initial state may be “INVALID / UNKNOWN / TRIAL”.
The application cannot be used if both licenses are in INVALID / EXPIRED / UNKNOWN state.
Validity
This field gives the validity of each of the license.
License related messages are displayed in the messages area.
Activate Button
Activate button is used to activate the product key. Enter the product key and click on the ‘Activate’ button to activate the key. Once the product key is activated, it gives a notification indicating the same.
Deactivate Button
Deactivate button de-activates the product key associated with this machine. The ‘Deactivate Button’ is only visible when a valid product key has been activated on the machine. The license key can now be used on another machine.
IMPORTANT: When uninstalling the software from the machine, remember to deactivate the software first.
Re-Validate Button
Revalidate button is used to revalidate the product key and license types with our servers. When the user purchases additional licenses, updates license features, click on the revalidate button to fetch updated license information from our servers.
Close Button
Closes the license dialog. If all the licenses are EXPIRED/INVALID/UNKNOWN then the application will also close. The application can only be used if the correct product key is entered and at least one license is of TRIAL / EXTENDED_TRIAL / SUBSCRIPTION / FULL type.
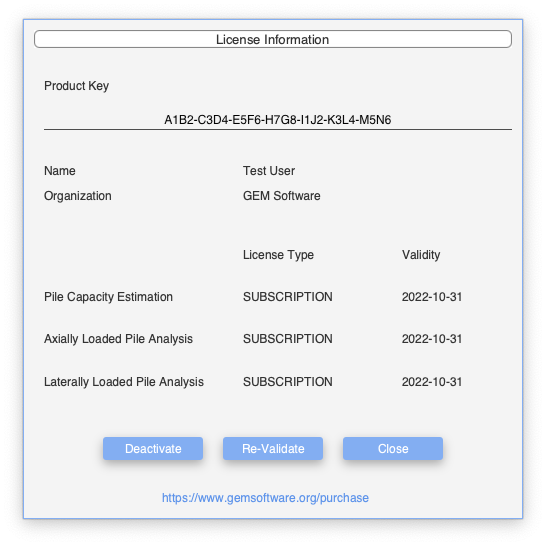
License information after SUBSCRIPTION license is activated.
About
About menu displays information regarding the application, copyright information and has links to “License” for this software.
Help
Displays help related information for the application